
All of us owners of fixed head coupes are usually lucky... we don't have to worry about tops leaking, tearing, fading, cracking and jamming... all we have to do is apply a little wax to keep it nice and shiny... Of course, this all ends when the first dreaded bubble appear on the headliner !
At first, it doesn't seem to be that bad, just small bubble, an inch or so. No big deal. Wrong. When that first bubble appears, that old layer of glue is simply sending you a message telling you that age and gravity are taking their toll faster that they do on aging super model and you'd better be ready for some cosmetic surgery if you don't want you Jaguar to have something in common with an old beat up 83 Chevy...
After the first bubble, things go downhill very fast and often within weeks others appear and grow until most of the headlining material is sagging and it's time to do something about it. At that time, you have two options... getting it done by a pro or doing it yourself.
First option is easy but unless you know that the shop is good, careful and experienced, it might lead you back where you started, only a few hundred dollars poorer... So if you're going to get it done by somebody else, make sure they've done a good job on other cars...
Second option is to do it yourself.
Replacing an E-type headliner is intimidating but in fact is a pretty easy and straightforward job you can tackle in one evening; of
course there are better ways to spend an evening...
When you order you headliner kit from one of the usual suspects, make sure you get the right color... Early series 3 had a Fawn colored headliner, later ones were light gray; the change occurred in early 1972 at S/N 72662.
The old headliner had been changed in the past, it was much a lighter gray than the kit I got from British Auto USA. I tore down the old material, and found a white heavy foam rubberish material glued to the metal, not a board as I expected. I can only assume that you could do the some thing if it was the original board so that you don't have to pull the windshield to get that board out as noted in the service manual... you don't want to pull you windshield now do you ?
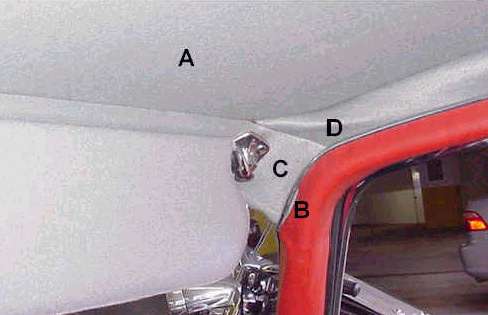
The vinyl trim above the door and rear window ( cant rail crash roll, B in the pictures) came off easily, after pulling the outside rubber seals and removing the screws hidden under the seals. The front metal plate (C) came off once the side trim, visors and mirror were removed. The side plates and rear plate don't come off.
Once the old stuff is off, you can use a stiff brush to remove old glue and foam residue but be careful not to damage the foam. Be ready for a mess with dust, have a vaccum ready and cover the interior with a sheet or blanket. speaking of preparation, it might also help to remove the driver seat especially if you've done this before as the bolts will come off easily.
After spraying the adhesive ( 3M super Trim adhesive 08090, found at West Marine ), came the only tricky part which was to bring the material in the car... I folded it in half length wise to align it, sprayed some adhesive along the fold in the center ( you're supposed to put glue on both sides...) brought it in, and first set the center. I then sprayed the other half and pushed it up.... that's when I pinched one spot... duhh....
In retrospect, I should have used the tube the headliner came on as a support and slid the whole thing from the rear hatch to keep perfectly centered, on a other piece of tube, set on the dash on the centerline, or bolted through the mirror hole. that would have make it less risky to align as there is enough extra material I did it by guessing, but still.. risky business...
Once the headliner was set, it's pretty easy to smooth it out without any creases or marks. Then I cut the excess material along the edge, leaving about 1 1/2 to tuck it under the metal frame that goes around the sides and rear. For that it helps if you don't overspray on the metal frame, and if there is no glue on the material. I used an 3 " plastic epoxy spreader to tuck it in. Be careful not use any hard tool there or you might end up with dents in your roof !
I decided not to glue the material which goes on the side and rear plate. There is piping on one side of the material, the edge that tucks between the plate and the roof, with the headliner itself. Each side is a separate piece with a return for half the rear, the interior light hides the joint. Under the material, I placed the thin foam which also came pre-cut. I then cut it about 1/3 " smaller than the frame.
By not gluing the side trim, I was able to adjust it at will to make it smooth, risk free... The only trick are the corners in the rear, along the rear hatch. I have a couple of creases there... I might work on it again to try to eliminate them....
The front plate came next, after gluing the material around it outside the car, it has to go back in before the side vinyl covered crash roll. That goes in loose at first so that I could tuck the material in, then tightened the screws holding the material in place.
I then reattached the mirror, visors, dome light, and rubber seals outside. For the visors since the old ones were starting to bend, instead of trying to stitch them, I ordered new one; they just slide on the rods but I almost missed the small chrome plugs which go in the holes opposite the rods next to the mirror.
Just over 4 hours altogether, and it came out well except for that one single 1/2 " spot that I goofed up, a slight bump where I pinched the material once the glue was on... when I unpinched it... the foam backing broke down with a touch of glue stain... oh well... you learn ...
Bottom line, it's not as hard as it seems and while there are better ways to spend an evening, the satisfaction of having tackled the job yourself is worth the effort.
And one last thing... make sure you wear an old cap ! I spend the next few days pulling glue out of my hair !
About the author - Pascal Gademer is the webmaster and newsletter editor of the South Florida Jaguar Club and webmaster for JCNA. Owner of a restored and upgraded (for reliability and performance) 1972 series 3 E-type 2+2, he doesn't miss an opportunity to drive his E-type to various events (concours, rallies,..) often regardless of distances. His daily driver his another Silver Coupe, a 2000 XKR.
Posted: 4/4/2002