
I had composed a detailed step-by-step set of instructions on rebuilding this pump if your problem is the incredibly common one where the brushes have finally been consumed after years of use. Unfortunately, I was automatically logged out before I hit the post button, so those are gone.
I'm giving the short version here, and the pictures to follow should help to fill in the gaps.
1. Remove the three screws that hold on the impeller housing then remove the impeller housing and set it aside. (It's virtually impossible that this has failed given what's inside it and how it works).
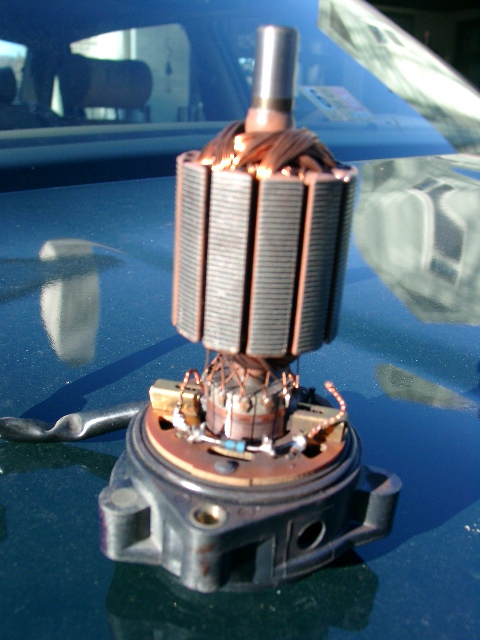
2. Remove the two screws that hold the motor armature assembly in the motor case. Pull the armature assembly straight out of the case.
3. Remove the drive magnet from the end of the armature that faces the impeller housing.
4. Carefully fold up the tabs at the back of the brush encasements, being very careful not to allow the springs to fly out. Remove the springs.
5. Pop the end of the armature up where it makes contact with the brushes so that you can pull out the old nubs and slip in the new replacements.
6. Push the armature back down into position.
7. Use a soldering iron to remove the old brush leads from the assembly.
8. Replace the springs and fold down the tabs.
9. Solder the new brush leads on to the armature.
10. Reassemble the motor in reverse order of taking it apart.
Brian
Submitted by asimko@netsolnj.com on Tue, 01/15/2013 - 06:59
Submitted by vogelbp@gmail.com on Sun, 01/13/2013 - 20:26
Dead Auxiliary Heater Pump MNC6710AC? Read on. . .
One more addendum:
The original brushes, and the replacements I purchased, have the woven copper lead wires embedded into the brush itself. When I sanded down the oversized replacements, I apparently did not cut them down to be *quite* short enough. Once they had been slid back into the brass containment sleeves there must have been just enough force on those leads to cut them, which disabled the motor again.
However, there is a work around if you do not wish to worry about having the leads embedded in the brush. The brass sleeve is electrically conductive as is the spring that applies pressure to keep the brush in contact with the armature. It is entirely possible to simply pinch the woven copper lead between the tab at the back of the sleeve and the spring. You end up with an entirely viable circuit. The only thing you have to remember is that you don't have the "fail safe" of the leads being cut by the armature just before the brushes are consumed after approximately 10 years of use. Eventually the spring itself will make contact with the armature if the brushes are consumed. For myself, that's not a particularly pressing worry.
[I'm still hoping someone will have the answer to the question I asked in my last post.]
Submitted by vogelbp@gmail.com on Sat, 01/12/2013 - 17:53
Dead Auxiliary Heater Pump MNC6710AC? Read on. . .
Howard,
I certainly did not drain the coolant from the entire system. You lose a few ounces from the feed tube, but if you quickly flex it up once you remove it the loss is very minimal. Since there's a check valve in the feed tube from the pump to the heater core you lose almost nothing from there. Be careful when you take the pump out, though, as there's enough coolant left in the impeller housing to make your hands a slippery mess unless you point the thing ground-ward and drain it into something.
I purchased the brushes I used from one of our local auto service facilities that does electrical work. The ones they had were slightly too large, both in the size of the "square" dimensions of the brush and the length. Both of these things are easily remedied using sandpaper and a bit of patience, but it's tedious work. You need to put a slight bevel on each corner of the long sides of the brush so that it doesn't bind in the feeder sleeve.
ADDITIONAL QUESTION: Does anyone know if the studs that slide through the top two holes on the heater pump bracket are available as parts and, if so, what the number is? These are made of brass (who would've thunk it?!) and I managed to snap both of them when I went to reinstall the pump. I have to imagine the end that you don't see is screwed in to the car and the broken ones can be removed with an EZ-out screw extractor. Any guidance on how one goes about sourcing these, or alternatives, and how to replace them would be appreciated.
Brian
Submitted by NE98-51693 on Sat, 01/05/2013 - 16:33
Dead Auxiliary Heater Pump MNC6710AC? Read on. . .
Can the electric motor and brushes be repaired without draining coolant from the vehicle? also, where can these brushes be purchased?
Submitted by NE98-51693 on Sat, 01/05/2013 - 16:33
Dead Auxiliary Heater Pump MNC6710AC? Read on. . .
Can the electric motor and brushes be repaired without draining coolant from the vehicle? also, where can these brushes be purchased?
Submitted by stevejag@sbcgl… on Thu, 12/06/2012 - 08:19
Dead Auxiliary Heater Pump MNC6710AC? Read on. . .
Well done, Brian! This should be a great help to those willing to jump in there and do it themselves.
This would be a good pre-emptive strike for any pump that's been on the job for a number of years.
Thanks!
Submitted by vogelbp@gmail.com on Wed, 12/05/2012 - 22:49
Dead Auxiliary Heater Pump MNC6710AC? Read on. . .
Impeller housing base plate placed over the bottom of the impeller. There is a seal around the impeller housing base plate that gets firmly pushed into place as you tighten the whole assembly back on to the motor case. Try to go around the three screws, tightening each only partially, until they are all eventually completely tightened. This helps the seal to seat correctly.
Submitted by vogelbp@gmail.com on Wed, 12/05/2012 - 22:44
Dead Auxiliary Heater Pump MNC6710AC? Read on. . .
Impeller (with tiny washer already on the shaft) placed back in to the housing.
Submitted by vogelbp@gmail.com on Wed, 12/05/2012 - 22:43
Dead Auxiliary Heater Pump MNC6710AC? Read on. . .
Interior of the impeller housing, since I already had it apart.
Submitted by vogelbp@gmail.com on Wed, 12/05/2012 - 22:41
Dead Auxiliary Heater Pump MNC6710AC? Read on. . .
Impeller housing disassembled. Note the tiny washer toward the bottom left. This slips on the shaft in front of the side of the impeller with the vanes. You shouldn't have to deal with this if you don't take apart the impeller housing, which I recommend you not doing.
Submitted by vogelbp@gmail.com on Wed, 12/05/2012 - 22:37
Dead Auxiliary Heater Pump MNC6710AC? Read on. . .
Drive magnet on end of armature next to the impeller housing. The other end is just the shaft that inserts into the motor housing behind the field magnets.
Submitted by vogelbp@gmail.com on Wed, 12/05/2012 - 22:35
Dead Auxiliary Heater Pump MNC6710AC? Read on. . .
Other nearly used-up brush.
Submitted by vogelbp@gmail.com on Wed, 12/05/2012 - 22:33
Dead Auxiliary Heater Pump MNC6710AC? Read on. . .
Close-up of the one brush that had worn down to the point that the brush lead had been severed.
when you remove the feed tube, you can clamp the hose with a cheap pair of needle nose vice grips from home depot. i have about 5 pair i use, with about 3 inches of plastic hose over the jaws, so they don't damage the hose, or mar whatever i clamp with them.
like these
http://www.all-spec.com/products/VG4LN.html